Minikube & Hyper-V: Fix Start Host Error

Recently, I’ve been struggling with a Minikube issue on Windows 11 with Hyper-V enabled and decided to share a quick note about it. Many people opt for VirtualBox, but I believe Hyper-V is a superior option because it’s a higher-level hypervisor that offers better performance. It’s also readily available on Windows without the need to install additional tools.

However, it’s not without its flaws, and this issue serves as a prime example. I had installed Minikube and kubectl, then started the cluster. After conducting tests and stopping it, I was unable to restart it the following day. Minikube only reported:

Exiting due to GUEST_PROVISION: error provisioning guest: Failed to start host: recreate: creating host: create: creating: exit status 1

There was also recommendation to use minikube delete to fix issue, but it did not work. The problem was in Hyper-V, not in Minikube: cluster was not enable to start because of broken cache. Fortunately solution is very simple:

  1. Use minikube delete to remove leftovers
  2. Use services.msc to disable all Hyper-V services
  3. Navigate to C:\ProgramData\Microsoft\Windows\Hyper-V\Virtual Machines Cache and remove all cache
  4. Restart computer or just re-enable Hyper-V services

After these steps, minikube start will work again and will create cluster for you without issues.
WSL – Reclaiming Storage Space

I’ve been a big fan of WSL ever since it came out – that to this solution, I can work daily with Windows, in my opinion the best and the most flexible OS, and still have all Linux advantages and a bit isolated work environment. Of course, WSL is not perfect and have some issues. One of them is taking up disk space. During our work, the size of the WSL file will become larger and larger. It will happen even if we will decide to jump into Linux distribution and remove a lot of unnecessary files. Fortunately, there is a quick solution – we can use diskpart includes in Windows to reclaim some space.

Continue reading “WSL – Reclaiming Storage Space”

Exploring sleep states in Windows

Microsoft Windows has changed considerably in latest years, everything because of changes on devices: we use smaller, more portable computers, we often want more battery life, but we do not want to lose performance or quick operational mode. If we add to these additional changes related to security, everything will become even more complicated and it is the current state of power settings in Windows: they are complex, some are hidden, some are hard to understand, some generate many issues.

Continue reading “Exploring sleep states in Windows”

How to select browser on link click

I must use two browsers – it is my preferred way to avoid distractions, do not mess everything in one place and also to use the best options they offer on both computer and mobile. The frequent problem which can occur in such a situation is browser selection. Operating systems like Windows or MacOS allow us to select one default browser, so each time we click on a link, web page is opened in that default browser. It may be annoying, especially if we want to have one default browser for one app, different for others.

Real life example: Slack. I need to open all Slack links in Chrome. On the other hand, I use HeidiSQL app and want to open all links from it in Microsoft Edge. How to deal with that? Of course, it is possible to use two profiles in the same browser – both Chrome and Edge allow to do that, but I do not like this option. I already use a lot of Google services but do not like Chrome for personal items, so this is not a good option. Second drawback: in such case, browser will work “correctly” only if latest active window is from context we want to use.

An example for better explanation let’s say we have personal and work profiles in Chrome. Both opened in separate windows. Go to personal window, do something, then go to Slack and click link – link will be opened in your personal context window, not work one. Similar: I’ve just used work Chrome profile, then opened HeidiSQL, clicked link and… Yes, it will be opened in work Chrome context. Messy situations cause us to always have to remember the context or reopen the link in the appropriate window. If we must do that manually, it is not a good option. If we have more browsers, the problem is even more complicated.

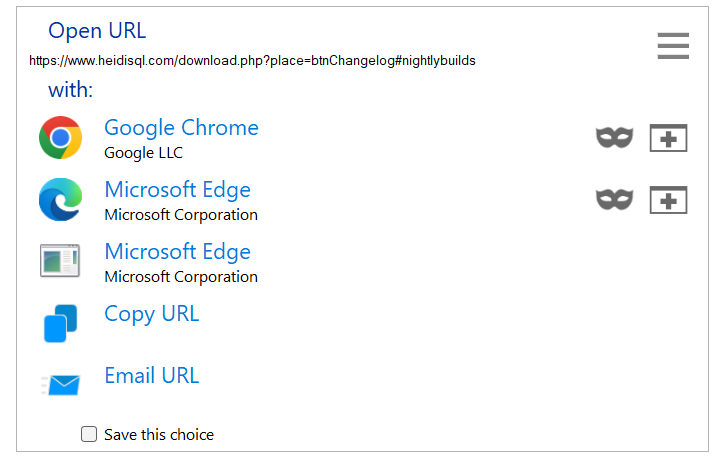
Fortunately, there is a solution for that – BrokenURL for Windows. This small, free app is something like browser selection. After installation we should set it as our default browser and… it’s all. When we click the link, it will open screen with all installed browsers and more options, because it simplifies link copying or sharing with others. It can detect browsers and even allow us to open links in incognito mode. We can save our choice, so within just a few minutes we can create templates for all important apps we use – and after that just forget about any issues related to browser selection. App is small, fast, does not include any ads or telemetry, does not monitor links, supports a lot of Windows versions and many browsers. I have used it for a few months and really recommend it.

BrokenURL browser selection after link clicking

What about other operating systems? I cannot recommend anything for Linux because I do not use it daily. Similar in MacOS, but I know there is an app called Velja available on Mac App Store with similar description and should handle the same cases. If you know more about it, let me and other readers know in the comments.

Reduce WSL and Docker disks size

I really like WSL/WSL2 in Windows – it provides a lot of features with minimal performance impact (WSL2) and I can still use Windows app. In combination with Docker, it can handle a lot of things and it’s much better for me than for example MacOS. One problem I discovered last time is space consumed by WSL, and also Docker volumes. In both cases, Windows uses Virtual Hard Disk (VHD) format, vhdx files to store all data.

The problem is Windows can extend virtual disks on demand, without asking about that, but doesn’t reclaim free space if we make bigger changes inside WSL filesystem or Docker volumes. I had few IDE versions and different instances, each about 1,5 – 2 GB, and it consumed a lot of space. After deletion them from WSL filesystem, I didn’t get any real free space on my computer disk. We have to manually compact virtual hard disks to do that. How to do this? It’s quite simple. First, we have to enable Hyper-V if it’s not enabled. Just run terminal or PowerShell with admin privileges and execute this command:

Enable-WindowsOptionalFeature -Online -FeatureName Microsoft-Hyper-V -All

System restart may be required after that.

Second step is to compact disks. First, close Docker Desktop if it’s running and also shut down WSL by command:

wsl --shutdown

Right now we can compact disks, command is also very simple:

Optimize-VHD -Path "path_to_disk.vhdx" -Mode Full  

The question is, where can we find these disks?

You can find disks created by Docker in:

SYSTEM_DRIVE\Users\your_username\Local\Docker\wsl // and then directories inside

Second thing is related to your WSL distro – all should be in the same main directory, but with different subdirectory. I use Ubuntu, from Canonical and in that case, data is located on:

SYSTEM_DRIVE\Users\your_username\Local\Packages\CanonicalGroupLimited(...)\LocalState\ext4.vhdx

Of course you can use search or tools like Everything to locale any *.vhdx file easily.

After execute command, file should become smaller and you will have more free space.